Showing posts with label Android. Show all posts

Thursday, May 22, 2014

Clicking unclickable list items

One of the UI patterns that improve lists usability is dividing items into sections. The section might be the first letter of the main text on the list item, date formatted and rounded in a specific way or whatever makes sense for your data.

From the technical point of view you can either add the header view to every list item and show and hide them as needed or create the separate view for header and regular list item and register multiple view types in your Adapter. Both options were described in details by +Cyril Mottier in excellent ListView Tips & Tricks #2: Sectioning Your ListView blog post.

If you choose the second approach, you'll have to decide what to return from your Adapter's getItem and getItemId methods for items representing sections. If your sections are not supposed to be clickable, you might implement your Adapter like this:
@Override
public Object getItem(int position) {
  return getItemViewType(position) == TYPE_ITEM
      ? mItems[getCursorPosition(position)]
      : null;
}

@Override
public long getItemId(int position) {
  return getItemViewType(position) == TYPE_ITEM
      ? getCursorPosition(position)
      : 0;
}

@Override
public boolean areAllItemsEnabled() {
  return false;
}

@Override
public boolean isEnabled(int position) {
  return getItemViewType(position) == TYPE_ITEM;
}
And your onListItemClickListener like this:
@Override
public void onListItemClick(ListView l, View v, int position, long id) {
  super.onListItemClick(l, v, position, id);

  // dummy action which uses Object returned from getItem(position)
  Log.d("DMFM", getListAdapter().getItem(position).toString());
}
If you do so, the Android has a nasty surprise for you:
java.lang.NullPointerException
    at org.chalup.dialmformonkey.app.MainFragment.onListItemClick(MainFragment.java:38)
    at android.app.ListFragment$2.onItemClick(ListFragment.java:160)
    at android.widget.AdapterView.performItemClick(AdapterView.java:298)
    at android.widget.AbsListView.performItemClick(AbsListView.java:1100)
    at android.widget.AbsListView$PerformClick.run(AbsListView.java:2749)
    at android.widget.AbsListView$1.run(AbsListView.java:3423)
    at android.os.Handler.handleCallback(Handler.java:725)
    ...
The only way this can happen is getting null from Adapter.getItem(), but this method will be called only for disabled items, right?
@Override
public void onListItemClick(ListView l, View v, int position, long id) {
  super.onListItemClick(l, v, position, id);

  Log.d("DMFM", "Clicked on item " + position + " which is " +
        (getListAdapter().isEnabled(position) 
            ? "enabled"
            : "disabled")
  );

  // dummy action which uses Object returned from getItem(position)
  Log.d("DMFM", getListAdapter().getItem(position).toString());
}
Wrong:
D/DMFM﹕ Clicked on item 4 which is enabled
D/DMFM﹕ Abondance
D/DMFM﹕ Clicked on item 4 which is enabled
D/DMFM﹕ Abondance
D/DMFM﹕ Clicked on item 31 which is enabled
D/DMFM﹕ Aragon
D/DMFM﹕ Clicked on item 31 which is enabled
D/DMFM﹕ Aragon
D/dalvikvm﹕ GC_CONCURRENT freed 138K, 3% free 8825K/9016K, paused 0ms+0ms, total 3ms
D/DMFM﹕ Clicked on item 28 which is disabled
It's very difficult to reproduce this error manually, especially if tapping the list item does something more than writing to logcat, but I investigated this issue, because the stack traces above appeared in crash reports on Google Analytics, so several people managed to click exactly wrong area at the wrong time.

I didn't investigate the issue thoroughly, but it seems there must be some disparity between checking the isEnabled method and getting the item. If I ever dive into ListView code, I'll definitely write about it. If you want to reproduce or investigate the issue yourself, compile this project and run the monkey:
$ adb shell monkey -p org.chalup.dialmformonkey.app -v 500
So what can we do? First option is checking the Adapter.isEnabled() in your onListItemClick listener, which is yet another kind of boilerplate you have to add to your Android code, but it's super easy to add. The other option is going with the first sectioning approach, i.e. putting section as a part of the clickable list item, but it might not work for your use case (for example adapter with multiple item types).

Saturday, May 10, 2014

Android App Widgets issues

This week I spend few days analyzing and fixing various issues of app widget in Base CRM application.

This part of our codebase was created over a year ago during one of our internal hackathons and was released soon after that. Most of the times it worked. Every once in a while we received a weird crash report from Google Analytics, but it never caused much trouble. Recently though we received few complaints from customers. I happened to have few hours available for bug hunting, so I took a dive.

The widget is really a simple todo list backed by ContentProvider. The code looks like it was based on the WeatherWidget from SDK samples. What can possibly go wrong?

Issue #1: gazillions of threads started

Take a look at the code of WeatherWidgetProvider:
public WeatherWidgetProvider() {
  // Start the worker thread
  sWorkerThread = new HandlerThread("WeatherWidgetProvider-worker");
  sWorkerThread.start();
  sWorkerQueue = new Handler(sWorkerThread.getLooper());
}
The WeatherWidgetProvider is an AppWidgetProvider implementation, which extends a regular BroadcastReceiver. It means that for every action a new instance of WeatherWidgetProvider is created, and the current implementation spawns new thread which is never closed.

The sample author obviously intended to create only one worker thread - the sWorkerThread is the static - but forgot to do the null check before creating a new thread. So let's fix it:
public WeatherWidgetProvider() {
  if (sWorkerThread == null) {
    // Start the worker thread
    sWorkerThread = new HandlerThread("WeatherWidgetProvider-worker");
    sWorkerThread.start();
    sWorkerQueue = new Handler(sWorkerThread.getLooper());
  }
}

Issue #2: no refresh after application update

The widget shows data from the same ContentProvider as the main app, so when the user creates a task inside in the main app and then goes back to homescreen, the task should be displayed on the widget. To achieve this we did the same thing the WeatherWidget sample does - we register the ContentObserver in onEnabled callback of AppWidgetProvider:

@Override
public void onEnabled(Context context) {
  final ContentResolver r = context.getContentResolver();
  if (sDataObserver == null) {
    final AppWidgetManager mgr = AppWidgetManager.getInstance(context);
    final ComponentName cn = new ComponentName(context, WeatherWidgetProvider.class);
    sDataObserver = new WeatherDataProviderObserver(mgr, cn, sWorkerQueue);
    r.registerContentObserver(WeatherDataProvider.CONTENT_URI, true, sDataObserver);
  }
}

The onEnabled callback is called when the first instance of the widget is added to homescreen, so the code looks fine. Unfortunately the callback is not called at your process startup. So if your app is updated and the process is restarted, the ContentObserver won't be registered. The same thing happens if your app crashes or is stopped by the OS to free resources.

To solve this you have to register the ContentObserver in few more places. I have added registration to onCreate callback in RemoteViewsFactory and the onReceive part which handles our custom actions in AppWidgetProvider.

WeatherWidget sample does one more thing wrong: the ContentObserver is never unregistered and the worker thread is never stopped. The correct place to do this is onDisabled callback in AppWidgetProvider.

Issue #3: CursorOutOfBoundsException crash

Ever since we introduced the tasks widget, we've occasionally received the crash reports indicating that the RemoteViewsFactory requested elements outside of [0, getCount) range:

05-10 15:22:50.559  13781-13795/org.chalup.widgetfail.widget E/AndroidRuntime﹕ FATAL EXCEPTION: Binder_2
    Process: org.chalup.widgetfail.widget, PID: 13781
    android.database.CursorIndexOutOfBoundsException: Index 1 requested, with a size of 1

The reproduction steps for this issue are quite complicated:
  • Tap the task on the widget to mark it was completed. Internally we set the PENDING_DONE flag, so the task is marked as done, but is still displayed on the list, so the user can tap it again and reset the flag.
  • Trigger the sync
  • SyncAdapter syncs the Task to our backend. The task is marked as DONE in our database, which triggers the ContentObserver registered by the widget.
  • ContentObserver triggers onDataSetChanged callback in RemoteViewsFactory, which then calls getCount and getViewAt
  • In some rare cases getViewAt with position == result of getCount is called
It looks like some kind of a race condition or another threading issue in Android code which populates the app widgets. I tried synchronizing the RemoteViewsFactory methods, but it didn't help. The getViewAt have to return a valid RemoteViews, so I fixed it up by returning the loading view when element outside of valid range is requested:

@Override
public synchronized RemoteViews getViewAt(int position) {
  if (position >= mCursor.getCount()) {
    return getLoadingView();
  } else {
    mCursor.moveToPosition(position);

    // ...
  }
}

Issue #4: no refresh when "Don't keep activities" setting is enabled

User can click on the tasks displayed on the widget to go to the edit screen. The activity is closed when user saves or discards changes and the homescreen with the widget is shown again. Changing the task triggers the ContentObserver, the onDataSetChanged is called on all active RemoteViewsFactories, but sometimes other callbacks (getCount, getViewAt, etc.) are not called.

It turns out this happens when the Homescreen activity is recreated because of low memory condition. To easily reproduce this issue you can check the "Don't keep activities" in developers settings.

I do not have a solution or workaround for this issue unfortunately. I'll file a bug report and hope for the best.

Recap

There are mutliple issues with the WeatherWidget sample and some issues with the system services responsible for populating app widgets with content. I've created a simple project which reproduces the issues #3 and #4 and shows the correct way of registering ContentObserver for your widget. The sources are available on Github.

Tuesday, February 25, 2014

Use minSdkVersion=10 for libraries

I've pushed new versions of microorm and thneed to Maven Central today. The most notable change for both libraries is dropping the support for Android 2.2 and earlier versions. The same change was applied to all Android libraries open sourced by Base. Why? +Jeff Gilfelt summed it up nicely:
This tweet is a good laugh, and an excellent example of what happens if you limit the discussion to 140 characters, but there are poor souls who might need an answer they can use as an objective argument. For them, here is my take on this one: you should drop support for Froyo because sizeable chunk of Java 1.6 APIs were missing from API level 8. I'm not talking about some dark corners of java packages, I'm talking about stuff like String.isEmpty(), Deque, NavigableSet, IOException's constructors with cause parameter, and so on.

Your own code can (and should) be checked with Lint, but these methods and classes can also be used by the 3rd party libraries and I'm not aware of any static analysis tool that can help you in this case. So if your app supports Froyo and uses a lot of external dependencies, you're probably sitting on the NoClassDefFoundError bomb. It might force you to use obsolete versions of libraries, the most notable example of which is Guava - on Froyo you have to use 13.0.1, a 18 months old version.

That's also the reason why the libraries authors should be the first ones to move on to Android 2.3 and later. If you use obsolete library in your application, you're hurting only yourself. If you use it as a library dependency, you're hurting every user of the library.

So move on and bump the minSdkVersion. After all, it's 2014.

Thursday, February 20, 2014

When do you absolutely need WakefulBroadcastReceiver

Yesterdays #AndroidDev #Protip explains how to use WakefulBroadcastReceiver utility class and what problem does it solve, but it doesn't mention a case when using it or manually acquiring WakeLock is essential - using the AlarmManager.

If you're not familiar with AlarmManager's API, here is tl;dr of the docs: it allows you to specify the PendingIntent that should be fired at some point, even if your application is in background. The common use cases for using AlarmManager is for example showing a Notification at the specified time or sending some kind of heartbeat to your backend. In both cases, your code performs potentially long running operation (in case of showing notification you might need some content from your local database), so you don't want to run it in the UI thread. The first thing that comes to mind is to specify an IntentService as a PendingIntent target:
PendingIntent intent = PendingIntent.getService(
  context, 
  0,
  new Intent(context, MyIntentService.class),
  PendingIntent.FLAG_UPDATE_CURRENT
);

AlarmManager alarmManager = (AlarmManager) context.getSystemService(Context.ALARM_SERVICE);
alarmManager.set(
  AlarmManager.ELAPSED_REALTIME_WAKEUP,
  SystemClock.elapsedRealtime() + TimeUnit.MINUTES.toMillis(15)
  intent
);
This code won't always work though. While it is guaranteed that the alarm will go off and the PendingIntent will be sent, because we used a _WAKEUP alarm type, the device is allowed to go back to sleep before the service is started.


It's not explicitly documented, but both +Dianne Hackborn and +CommonsWare confirmed this. The workaround is to use PendingIntent.getBroadcast(), because it is guaranteed that the BroadcastReceiver.onReceive() will be always fully executed before the CPU goes to sleep. Inside that callback you have to acquire WakeLock start your IntentService and release the lock at the end of onHandleIntent() method.


This is where the WakefulBroadcastReceiver comes into play: its startWakefulService and completeWakefulIntent static methods encapsulate all the WakeLocks juggling, allowing you to focus on your business logic.

Saturday, January 25, 2014

Offline mode in Android apps, part 3 - old db schemas

The first post in this series explained the first consequence on implementing the offline mode - performing the data migrations. In second part I showed a workaround for the rudimentary SQLite's ALTER TABLE syntax. If you have checked the link to MigrationHelper class I mentioned, you migth have noticed that it's just a tiny part of a larger library, which allows you to define database schemas. Note the plural "schemas": the whole point of this library is defining both current schema and the schemas for the older versions of your app. This post explains why do you have to do this.

Let's say in the first version you have the following data structure:
public static class User {
  public long id;
  public String firstName;
  public String lastName;
  public String email;
}
And the table definition for this table in your SQLiteOpenHelper looks like this:
private static final String CREATE_TABLE_USERS = "CREATE TABLE " +
    TABLE_USERS +
    " ( " +
    ID + " INTEGER PRIMARY KEY AUTOINCREMENT " + ", " +
    FIRST_NAME + " TEXT " + ", " +
    LAST_NAME + " TEXT " + ", " +
    EMAIL + " TEXT " +
    " ) ";
In the next version you decide to keep only the first name in a single field, so you change your data structure accordingly and perform the data migration. In the snippet below I used the MigrationHelper, but you might have as well performed the migration by hand:
private static final String CREATE_TABLE_USERS = "CREATE TABLE " +
    TABLE_USERS +
    " ( " +
    ID + " INTEGER PRIMARY KEY AUTOINCREMENT " + ", " +
    NAME + " TEXT " + ", " +
    EMAIL + " TEXT " +
    " ) ";

@Override
public void onUpgrade(SQLiteDatabase db, int oldVersion, int newVersion) {
  MigrationsHelper helper = new MigrationsHelper();
  if (oldVersion < 2) {
    helper.performMigrations(db, 
        TableMigration.of(TABLE_USERS)
            .to(CREATE_TABLE_USERS)
            .withMapping(NAME, FIRST_NAME)
            .build()
    );
  }
}
Then you decide that the email field should be mandatory, so you change the schema and migrate the data again:
private static final String CREATE_TABLE_USERS = "CREATE TABLE " +
    TABLE_USERS +
    " ( " +
    ID + " INTEGER PRIMARY KEY AUTOINCREMENT " + ", " +
    NAME + " TEXT " + ", " +
    EMAIL + " TEXT NOT NULL" +
    " ) ";

@Override
public void onUpgrade(SQLiteDatabase db, int oldVersion, int newVersion) {
  MigrationsHelper helper = new MigrationsHelper();
  if (oldVersion < 2) {
    helper.performMigrations(db,
        TableMigration.of(TABLE_USERS)
            .to(CREATE_TABLE_USERS)
            .withMapping(NAME, FIRST_NAME)
            .build()
    );
  }
  if (oldVersion < 3) {
    db.execSQL("DELETE FROM " + TABLE_USERS + " WHERE " + EMAIL + " IS NULL");
    helper.performMigrations(db,
        TableMigration.of(TABLE_USERS)
            .to(CREATE_TABLE_USERS)
            .build()
    );
  }
}
The code looks fine, but you have just broken migrations from v1 to v3. If there is an user with a null email field, the app will crash in line 13 above. But why, shouldn't the email field in v2 schema be nullable? It should, but this migration uses the constant containing the latest schema definition with different column constraint.

The worst thing about this kind of bugs is that it might slip through your tests, because the crash happens only if you have a specific data before the application update.

You migth be tempted to define separate migrations from every old version to the latest one (in our case migrations from v1 to v3 and from v2 to v3) and always execute only single migration, but this workaround doesn't scale. For each new migration you'd have to check and potentially update every existing migration. When you publish the app twice a month, this quickly becomes a huge problem.

The other solution is to make every migration completely independent from the others, and execute them sequentially. This way, when you define a new migration, you don't have to worry about the previous ones. This means that when you upgrade from v1 to v3, you first upgrade from v1 to v2 and then from v2 to v2 and after the first step the database should be in the same state it were, when the v2 was the latest version. In other words, you have to keep an old database schemas.

As usual there are multiple ways to do this. You can copy the schema definition to another constant and append "ver#" suffix, but it means there will be a lot of duplicated code (although this code should never, ever change, so it's not as bad as the regular case of copypaste). The other way is to keep the initial database state and all the schema updates. The issue here is that you don't have a place in your code with current schema definition. The opposite solution is to keep the current schema and the list of downgrades. Sounds counterintuitive? Don't worry, that's because it *is* counterintuitive.

In android-schema-utils I've chosen the third approach, because in the long run it processes less data than the upgrades solution - in case of upgrade from vN-1 to vN it has to generate only 1 additional schema instead of N-1 schemas. I'm still not sure if the code wouldn't be clearer had I went with duplicated schema definitions approach, but the current approach, once you get used to it, works fine. The schema and migrations for our example would look like this:
private static final MigrationsHelper MIGRATIONS_HELPER = new MigrationsHelper();
private static final Schemas SCHEMAS = Schemas.Builder
    .currentSchema(3,
        new TableDefinition(TABLE_USERS,
            new AddColumn(ID, "INTEGER PRIMARY KEY AUTOINCREMENT"),
            new AddColumn(NAME, "TEXT"),
            new AddColumn(EMAIL, "TEXT NOT NULL")
        )
    )
    .upgradeTo(3,
        new SimpleMigration() {
          @Override
          public void apply(SQLiteDatabase db, Schema schema) {
            db.execSQL("DELETE FROM " + TABLE_USERS + " WHERE " + EMAIL + " IS NULL");
          }
        },
        auto()
    )
    .downgradeTo(2,
        new TableDowngrade(TABLE_USERS, new AddColumn(EMAIL, "TEXT"))
    )
    .upgradeTo(2,
        SimpleTableMigration.of(TABLE_USERS)
            .withMapping(NAME, FIRST_NAME)
            .using(MIGRATIONS_HELPER)
        )
    .downgradeTo(1,
        new TableDowngrade(TABLE_USERS,
            new AddColumn(FIRST_NAME, "TEXT"),
            new AddColumn(LAST_NAME, "TEXT"),
            new DropColumn(EMAIL)
        )
    )
    .build();
There are other benefits of keeping the old schemas in a more reasonable format than raw strings. Most of the schema migrations can be deducted from comparing subsequent schema versions, so you don't have to do it yourself. For example in migration from v2 to v3 I didn't have to specify that I want to migrate the Users table - the auto() migration automatically handles it. If the auto() is the only migration for a given upgrade, you can skip the whole upgradeTo() block. In our case that covered about 50% migrations, but YMMV.

If you go this way, your onUpgrade method, which usually is the most complex part of SQLiteOpenHelper, can be reduced to this:
@Override
public void onUpgrade(SQLiteDatabase db, int oldVersion, int newVersion) {
  SCHEMAS.upgrade(oldVersion, mContext, db);
}
This part concludes the "offline mode" series. Here's the short recap:

  • If you don't want to compromise on UX, your application should work regardless whether the user is connected to internet or not.
  • In this case the user may end up in a situation when the application is upgraded, but not all data is synced with the server yet. You *do not* want to lose your users' data. You'll have to migrate them.
  • If you migrate your data, you should keep the migrations separate from one another, because otherwise maintaining them becomes a nightmare.
  • The best way to do this that I know of, is keeping the old schemas and always performing all migrations sequentially. To make things simpler, I recommend the android-schema-utils library.

Sunday, January 12, 2014

Android SQLiteDatabase gotcha

In my previous post I mentioned a nasty SQLiteDatabase gotcha and recommended using the MigrationHelper utility I wrote. If you have checked this class's sources, you might have noticed a weird code. Before getting the list of columns the table is renamed to the temporary name and then renamed back:
final String tempTable = "tmp_" + tempTableIndex++;
db.execSQL("ALTER TABLE " + migration.tableName + " RENAME TO " + tempTable);
ImmutableSet<String> oldColumns = getColumns(db, tempTable);

db.execSQL(migration.createTableStatement);
final String tempNewTable = "tmp_" + tempTableIndex++;
db.execSQL("ALTER TABLE " + migration.tableName + " RENAME TO " + tempNewTable);
ImmutableSet<String> newColumns = getColumns(db, tempNewTable);

db.execSQL("ALTER TABLE " + tempNewTable + " RENAME TO " + migration.tableName);

private static ImmutableSet<String> getColumns(SQLiteDatabase db, String table) {
Cursor cursor = db.query(table, null, null, null, null, null, null, "0");
if (cursor != null) {
try {
return ImmutableSet.copyOf(cursor.getColumnNames());
} finally {
cursor.close();
}
}
return ImmutableSet.of();
}
Initially the MigrationHelper's code looked like this:
static final String TEMP_TABLE = "tmp";
db.execSQL("ALTER TABLE " + migration.tableName + " RENAME TO " + TEMP_TABLE);
ImmutableSet<String> oldColumns = getColumns(db, TEMP_TABLE);

db.execSQL(migration.createTableStatement);
ImmutableSet<String> newColumns = getColumns(db, migration.tableName);
It worked for a single migration, but didn't work for multiple migrations - the helper method for getting the column set always returned the columns of first table. Since the query was always the same, I suspected the results are cached somewhere. To verify this hypothesis I added to the temporary table name an index incremented with every migration. It worked, but then I realized I need to do the same for getting the columns of the new schema - otherwise the helper wouldn't work if the same table were migrated twice. This way the weird code was born.

But the same thing could happen outside of MigrationHelper operations, for example if you need to iterate through rows of the same table in two different migrations:
@Override
public void onUpgrade(final SQLiteDatabase db, int oldVersion, int newVersion) {
  if (oldVersion <= 1500) {
    Cursor c = db.query("some_table", /* null, null, null... */);
    // use Cursor c
  }

  // other migrations, including ones that change the some_table table's columns

  if (oldVersion <= 2900) {
    Cursor c = db.query("some_table", /* null, null, null... */);
    // try to use Cursor c and crash terribly
  }
}
So I checked the AOSP code for the suspected cache to see how the entries can be evicted or if the cache can be disabled. There are no methods for this, so you can't do it with straightforward call, but maybe you can exploit the implementation details?

On ICS the cache is implemented as LruCache, so theoretically you could evict old entries by filling the cache with new ones, but there is one hiccup - you don't know the cache size, so you'd always have to go with MAX_SQL_CACHE_SIZE.

Before ICS you couldn't do even that - the implementation of this "cache" is just a fixed size buffer for SQLiteStatements. Once that buffer is full, no more statements are cached. This also has one more consequence - your app might work much slower on Android 2.x after upgrade from old version than after fresh install, because the db cache will be filled with queries used in migrations.

Fortunately the keys of this cache are raw SQL strings, so we can disable cache for migration queries by adding "WHERE n==n" clause with n incremented for every query (note that you musn't pass n as a bound parameter - the whole point of adding this selection is to make the queries different and force  SQLiteDatabase to compile another statement).

The question you should ask yourself is why do I have to know and care about all this. Isn't SQLite smart enough to see that I'm trying to access the database using prepared statement compiled against old schema? It turns out the SQLite detects this issues and raises SQLITE_SCHEMA error (commented with "The database schema changed"), but Android's SQLiteDatabase wrapper drops this error and happily uses the old, invalid statements. Bad Android.

Friday, January 3, 2014

Offline mode in Android apps, part 2 - SQLite's ALTER TABLE

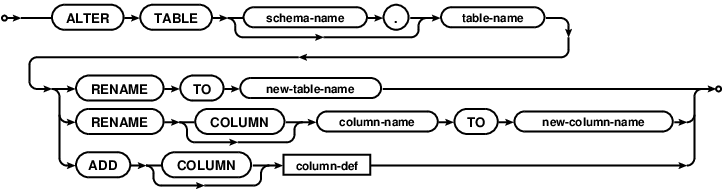
In first part of this series I showed that to implement offline mode in your Android app you have to implement data migrations. If you're using SQLite database, it means you'll have to use (or rather work around) it's ALTER TABLE syntax:


So all you can do with it is adding the column or renaming the table, but in reality you probably need to alter a single column, remove column or change the table constraints. You can achieve this by doing the following operation:
  1. Rename the table T with old schema to old_T.
  2. Create the table T with new schema.
  3. Use "INSERT INTO T (new_columns) SELECT old_columns FROM old_T" query to populate the table T with the data from the renamed table old_T.
  4. Drop old_T.
Doing it manually is quite error prone though: for every migration you have to specify the new_columns and old_columns list. What's worse, in 95% of cases you just want to list the columns common for old and new schema. Fortunately we can automate such trivial migrations by executing SELECT with LIMIT 0 (or PRAGMA TABLE_INFO) for both tables, getting the columns set using Cursor.getColumnNames(), and calculating these columns sets intersection.

You can write a nice wrapper for this yourself, but a) I already did it, so you don't have to and b) there is a very nasty gotcha which would probably cost you few hours of teeth grinding, so do yourself a favor and check this repository out, especially the MigrationsHelper class. It automates the trivial migrations and allows you to define a mappings for situations when you rename the column or add a non-nullable column in new schema.

In the next two posts I'll describe the gotcha I've mentioned in the previous paragraph and show some other non-obvious consequences of doing data migrations.

Thursday, December 26, 2013

Offline mode in Android apps, part 1 - data migrations

This year I gave a talk on Krakdroid conference about offline mode in Android apps. By offline mode I mean implementing the app such way that the network availability is completely transparent to the end users. The high level implementation idea is to decouple the operations changing the data from sending these changes through unreliable network by saving the changes in local database and sending them at convinient moment. We have encountered two major problems when we implemented this behavior in Base CRM: data migrations and identifying entities. This blog post describes the first issue.

It might not be obvious why do you need the data migrations, so let's clear this out. Let's say on your mobile you have some data synced with backend (green squares on left and right) and some unsynced data created locally on mobile (red squares on the left).


Now let's say that we introduce new functionality to our app, which changes the schema of our data models (the squares on the backend side are changed to circles).


The schema of the local database have to be changed as well. The naive way of handling this situation is dropping old database with old schema, creating new one with new schema and resyncing all the data from backend, but there are two issues with this approach: if there is a lot of data the resyncing might take a while, which negates the most important advantage of offline mode - that the app is fully functional all the time.


More serious issue is that dropping the old database means that the unsynced data will be dropped along with it.


The only way to provide the optimal user experience is to perform schema migrations locally for both synced and unsynced data:


Migrating the data doesn't sound like a challenging thing to code, but the combination of obscure SQLite and Android issues complicates the matter. Without proper tools it's quite easy to make your code unmaintainable in the long run. I'll describe this issues and our solutions in the further posts.

Tuesday, December 24, 2013

Krakdroid 2013

At the beginning of the December I had an opportunity to gave a talk on a Krakdroid conference. The organizers outdid themselves this year, the venue, other speakers and the overall event atmosphere was amazing. Definitely a place to be at if you're in Krakow at the end of the year.

This year I talked about the offline mode in Android apps. The talk was 30% sales pitch, 10% shameless plug and 60% describing the pitfalls one can fall into when implementing offline mode. I'm going to describe two major problems with offline mode in details on my blog and here are the slides:

Protip on giving a public speech - take a sip of water every 2-3 slides, especially if you're not feeling well and you have a sore throat.

I got an atrocious headache in the afternoon and went home, so I didn't see all the talks, but I've seen the rare thing - a succesful live coding - by +Wojtek Erbetowski who presented the RoboSpock testing framework and incrementally turned a meh-Java code into concise Groove goodness. +Maciej Górski did the maps framework overview, and although he's the author of excellent Android Maps Extensions he managed to be surprisingly objective. The first talk by +Wojtek Kaliciński triggered an internal discussion and Base about reducing the support for old Android versions. It won't happen overnight, but at least we've moved from the dangerous "c'mon, it's not that hard to support Froyo" mindtrack. I'll definitely write more about this.

To summarise, it was a great event. I've learned a lot, I've met some interesting people and I gave another talk, which completes one of the goals I set myself up for 2013. Good stuff.

Tuesday, December 3, 2013

SQLite views gotcha

tl;dr: don't left join on view, or you gonna have a bad time.

I have investigated a performance issue of the db in Android app today. The symptoms looked like a classic case of the missing index: the performance degraded with adding more data to certain tables. However, the quick check of sqlite_master table and looking at some EXPLAIN QUERY PLAN queries indicated that everything is properly indexed (which is not very surprising, given that we use android-autoindexer).

I started dumping the explain query plans for every query and it turned out that some queries perform multiple table scans instead of single scan of main table + indexed searches for joined tables. It means that the indices were in place, but they weren't used.

The common denominator of these queries was joining with a view. Here's the simplest schema which demonstrates the issue:

sqlite> create table x (id integer);
sqlite> create table y (id integer, x_id integer);

sqlite> explain query plan select * from x left join y on x.id = x_id;
selectid    order       from        detail
----------  ----------  ----------  ----------------------------------------------------------------
0           0           0           SCAN TABLE x (~1000000 rows)
0           1           1           SEARCH TABLE y USING AUTOMATIC COVERING INDEX (x_id=?) (~7 rows)

sqlite> create view yyy as select * from y;

sqlite> explain query plan select * from x left join yyy on x.id = x_id;
selectid    order       from        detail
----------  ----------  ----------  -------------------------------------------------------------------
1           0           0           SCAN TABLE y (~1000000 rows)
0           0           0           SCAN TABLE x (~1000000 rows)
0           1           1           SEARCH SUBQUERY 1 USING AUTOMATIC COVERING INDEX (x_id=?) (~7 rows)

Of course this behaviour is documented in the SQLite Query Planner overview (point 3 of the Subquery flattening paragraph), and I even remember reading this docs few times, but I guess something like this has to bite me in the ass before I memorize it.

Everything works fine if you copypaste the views selection in place of the joined view, which makes me a sad panda, because I wish SQLite could do this for me. On the other hand it's a very simple workaround for this issue, and, with a right library, the code might even be manageable.

Wednesday, November 6, 2013

SQL injection through ContentProvider projection

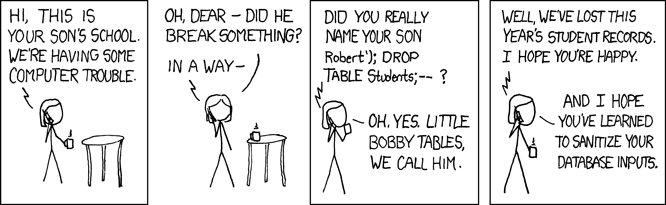
The SQL injection through query parameters is the common security issue of any system using SQL database. Android is no different than any other system, so if you're using SQLite database in your Android app, you should always sanitize the database inputs.

Obligatory XKCD
If you are also using an exported ContentProvider, you need to take care of one more vector of attack: the projection parameter of the queries. Just like SQLiteDatabase, the ContentProvider allows the users to specify which columns they want to retrieve. It makes sense, because it reduces the amount of data fetched, which might improve performance and reduce the RAM footprint of your app. Unlike the SQLiteDatabase, the ContentProvider might be exported, which means that the external applications can query the data from it requesting an arbitrary projection, which are then turned into raw SQL queries. For example:

'Bobby Tables was here'; DROP TABLE Students; --
* FROM sqlite_master; --
* FROM non_public_table_I_found_out_about_using_previous_query; --

Basically it means that if you exposed a single uri without sanitizing the projection, you have exposed your entire db.

So how do you sanitize your projections? I've given it some thought and it seems that the only sensible thing to do is allowing only subsets of predefined set of columns.

You cannot allow any expression, because you'd allow any expressions, including SELECTs from other tables and allowing certain expressions is not a trivial task.

You shouldn't ignore the provided projection and return all columns, because one of the benefits of using projections is limiting the amount of data retrieved from database. Besides, certain widely used Google application ignores the existence of Cursor.getColumnIndex method and assumes that the columns will be returned in the same order they were specified in projection. The other app won't work correctly, and the users will probably blame you.

Tuesday, November 5, 2013

Android drawables stroke inconsistency

I've run into a funny little problem when creating custom drawables recently - some of the lines were crisp and some were blurred:


After few debug iterations I was able to narrow down the difference to the shapes drawn using the Canvas.drawRoundRect and Canvas.drawPath. The former looked much crispier. I've dug down to Skia classes and it turns out that they reach the same drawing function through slightly different code paths and I guess at some point some rounding is applied at one of them, but I haven't verified this.

The minimal example which demonstrates the issue are two solid XML shape drawables (which are parsed into GradientDrawables), one with radius defined in radius attribute, the other one with four radii defined (can be the same).

Besides satisfying my idle curiosity and honing my AOSP code diving skills, I have learned something useful: do not mix paths and round rects on Canvas and use Path.addRoundRect with radii array when your path contains other curved shapes.

Monday, October 28, 2013

Mobilization 2013

I gave the talk at the Mobilization 2013 conference this weekend. I have presented few libraries created at Base CRM to make the data model maintainable. Here are the slides:


Besides giving the talk, I have attended few other very interesting talks: +Wojtek Erbetowski has shown the way they test Android apps at Polidea using RoboSpock+Mateusz Grzechociński introduced Android devs to new build system and shared an awesome gradle protip: use --daemon command line parameter to shave off few seconds from gradle startup. +Mateusz Herych described the Dagger basics and warned about few pitfalls. Mieszko Lassota described some UI blunders not only from the programming world. Finally, Krzysztof Kocel and Paweł Urban summarised the security pitfalls.

All in all, this years Mobilization conference was a great place to be at. See you there next year!

Friday, October 4, 2013

More Guava goodies - AbstractIterator

A while ago I wanted to perform a certain operation for every subsequent pair of elements in collection, i.e. for list [1, 2, 3, 4, 5] I wanted to do something with pairs (1, 2), (2, 3), (3, 4), (4, 5). In Haskell that would be easy:
Prelude> let frobnicate list = zip (init list) (tail list)
Prelude> frobnicate [1..5]
[(1,2),(2,3),(3,4),(4,5)]
The problem is, I needed this stuff in my Android app, which means Java. The easiest thing to write would be obviously:
List<T> list;
for (int i = 1; i != list.size(); ++i) {
  T left = list.get(i-1);
  T right = list.get(i);

  // do something useful
}
But where's the fun with that? Fortunately, there is Guava. It doesn't have the zip or init functions, but it provides tool to write them yourself - the AbstractIterator. Tl;dr of the documentation: override one method returning an element or returning special marker from endOfData() method result.

The zip implementation is pretty straightforward:
public static <TLeft, TRight> Iterable<Pair<TLeft, TRight>> zip(final Iterable<TLeft> left, final Iterable<TRight> right) {
  return new Iterable<Pair<TLeft, TRight>>() {
    @Override
    public Iterator<Pair<TLeft, TRight>> iterator() {
      final Iterator<TLeft> leftIterator = left.iterator();
      final Iterator<TRight> rightIterator = right.iterator();

      return new AbstractIterator<Pair<TLeft, TRight>>() {
        @Override
        protected Pair<TLeft, TRight> computeNext() {
          if (leftIterator.hasNext() && rightIterator.hasNext()) {
            return Pair.create(leftIterator.next(), rightIterator.next());
          } else {
            return endOfData();
          }
        }
      };
    }
  };
}
The tail can be achieved simply by calling the Iterables.skip:
public static <T> Iterable<T> getTail(Iterable<T> iterable) {
  Preconditions.checkArgument(iterable.iterator().hasNext(), "Iterable cannot be empty");
  return Iterables.skip(iterable, 1);
}
For init you could write similar function:
public static <T> Iterable<T> getInit(final Iterable<T> iterable) {
  Preconditions.checkArgument(iterable.iterator().hasNext(), "Iterable cannot be empty");
  return Iterables.limit(iterable, Iterables.size(iterable));
}
But this will iterate through the entire iterable to count the size. We don't need the count however, we just need to know if there is another element in the iterable. Here is more efficient solution:
public static <T> Iterable<T> getInit(final Iterable<T> iterable) {
  Preconditions.checkArgument(iterable.iterator().hasNext(), "Iterable cannot be empty");

  return new Iterable<T>() {
    @Override
    public Iterator<T> iterator() {
      final Iterator<T> iterator = iterable.iterator();
      return new AbstractIterator<T>() {
        @Override
        protected T computeNext() {
          if (iterator.hasNext()) {
            T t = iterator.next();
            if (iterator.hasNext()) {
              return t;
            }
          }
          return endOfData();
        }
      };
    }
  };
}
All methods used together look like this:
List<T> list;
for (Pair<T, T> zipped : zip(getInit(list), getTail(list))) {
  // do something useful
}

Monday, September 30, 2013

Mobilization 2013 and Android Tech Talks meetup

I'll give the presentation on this years Mobiliztion conference in Łódź on October 26th:


I'll talk about challenges related to ContentProvider and data model in general we faced during 2 years of development of Base CRM for Android. Even if this particular topic does not concern you, the agenda is ripe with other interesting Android topics: dependency injection with Dagger, Gradle, unit testing, continuous integration. It's not Android specific event - there are also several presentations about other mobile platforms.

If you already have other plans for October 26th, you want to share some war stories related to data model on Android or you just want to talk about Android with fellow geeks, I recommend you a MeetUp happening next week in Kraków: Android Tech Talks #3. I'll give a short topic intro, which (I hope) will be followed by deep, insightful discussion.

Saturday, September 21, 2013

Guava goodies

This is a long overdue post after my Guava on Android post from February. Since then I've been using Guava in pretty much every Java project I was involved in and I still find new stuff that makes my code both shorter and clearer. Some random examples:

Objects.equal()
// instead of:
boolean equal = one == null
    ? other == null
    : one.equals(other);

// Guava style:
boolean equal = Objects.equal(one, other);
Objects.hashcode()
// instead of:
@Override
public int hashCode() {
  int result = x;
  result = 31 * result + (y != null ? Arrays.hashCode(y) : 0);
  result = 31 * result + (z != null ? z.hashCode() : 0);
  return result;
}

// Guava style:
@Override
public int hashCode() {
  return Objects.hashCode(x, y, z);
}
Joiner
// instead of:
StringBuilder b = new StringBuilder();
for (int i = 0; i != a.length; ++i) {
  b.append(a[i]);
  if (i != a.length - 1) {
    b.append(", ");
  }
}
return b.toString();

// Guava style:
Joiner.on(", ").join(a);
ComparisonChain
// instead of:
@Override
public int compareTo(Person other) {
  int cmp = lastName.compareTo(other.lastName);
  if (cmp != 0) {
    return cmp;
  }
  cmp = firstName.compareTo(other.firstName);
  if (cmp != 0) {
    return cmp;
  }
  return Integer.compare(zipCode, other.zipCode);
}

// Guava style:
@Override
public int compareTo(Person other) {
  return ComparisonChain.start()
      .compare(lastName, other.lastName)
      .compare(firstName, other.firstName)
      .compare(zipCode, other.zipCode)
      .result();
}

Lists, Maps and Sets classes contain bunch of newFooCollection, which effectively replace the diamond operator from JDK7, but also allow you to initialize the collection from varargs.

Sets also contain the difference, intersection, etc. methods for common operations on sets, which a) have sane names, unlike some stuff from JDK's Collections, and b) doesn't change operands, so you don't have to make a defensive copy if you want to use the same set in two operations.

Speaking of defensive copying: Guava has a set of Immutable collections, which were created just for this purpose. There are few other very useful collections: LoadingCache, which you can think of as a lazy map with specified generator for new items; Multiset, very handy if you need to build something like a histogram; Table if you need to lookup value using two keys.

The other stuff I use very often are Preconditions. It's just a syntactic sugar for some sanity checks in your code, but it makes them more obvious, especially when you skim through some unfamiliar code. Bonus points: if you don't use the return values from checkNotNull and checkPositionIndex, you can remove those checks from performance critical sections using Proguard.

On Android you have the Log.getStackTraceString() helper method, but in plain Java you'd have to build one from Throwable.getStackTrace(). Only you don't have to do this, since Guava have Throwables.getStackTraceAsString() utility method.

Guava introduces also some functional idioms in form of Collections2.transform and Collections2.filter, but I have mixed feelings about them. On one hand sometimes they are life savers, but usually they make the code much uglier than the good ol' imperative for loop, so ues them with caution. They get especially ugly when you need to chain multiple transformations and filters, but for this case the Guava provides the FluentIterable interface.

None of the APIs listed above is absolutely necessary, but seriously, you want to use Guava (but sometimes not the latest version). Each part of it raises the abstraction level of your code a tiny bit, improving it one line at the time.

Thursday, September 12, 2013

Forger library

Sometimes the code you write is hard to test, and the most likely reason for this is that you wrote a shitty code. Other times, the code is quite easy to test, but setting up the test fixture is extremely tedious. It may also mean that you wrote a shitty code, but it may also mean that you don't have the right tools.

For me the most painful part of writing tests was filling the data model with some fake data. The most straightforward thing to do is to write helper methods for creating this data, but this means you'll have two pieces of code to maintain side by side: the data model and the helper methods. The problem gets even more complicated when you need to create a whole hierarchy of objects.

The first step is generating a valid ContentValues for your data model. You need to know the column names and the type of the data that should be generated for a given column. Note that for column data type you cannot really use the database table definitions - for example sqlite doesn't have boolean column type, so you'd define your column as integer, but the valid values for this column are only 1 and 0.

This is not enough though, because you'd generate random values for the foreign keys, which might crash the app (if you enforce the foreign key constraints) or break some other invariants in your code. You might work around this by creating the objects in the right order and overriding generated data for foreign key columns, but this would be tedious and error prone solution.

I have recently posted about my two side-projects: MicroOrm and Thneed. The former let's you annotate fields in POJO and handles the conversion from POJO to ContentValues and from Cursor to POJO:
public class Customer {
  @Column("id")
  public long id;

  @Column("name")
  public String name;
}

public class Order {
  @Column("id")
  public long id;

  @Column("amount")
  public int amount;

  @Column("customer_id")
  public long customerId;
}
The latter allows you to define the relationships between entities in your data model:
ModelGraph<ModelInterface> modelGraph = ModelGraph.of(ModelInterface.class)
    .identifiedByDefault().by("id")
    .where()
    .the(ORDER).references(CUSTOMER).by("customer_id")
    .build();
See what I'm getting at?

The returned ModelGraph object is a data structure that can be processed by independently written processors, i.e. they are the Visitable and Visitor parts of the visitor design pattern. The entities in relationship definitions are not a plain marker Objects - the first builder call specifies the interface they have to implement. This interface can be used by Visitors to get useful information about the connected models and, as a type parameter of ModelGraph, ensures that you are using the correct Visitors for your ModelGraph. See my last post about Visitors for more information about generifying the visitor pattern.

In our case the interface should declare which POJO contains MicroOrm annotations and where should the generated ContentValues be inserted:
public interface MicroOrmModel {
  public Class<?> getModelClass();
}

public interface ContentResolverModel {
  public Uri getUri();
}

interface ModelInterface extends ContentResolverModel, MicroOrmModel {
}

public static final ModelInterface CUSTOMER = new ModelInterface() {
  @Override
  public Uri getUri() {
    return Customers.CONTENT_URI;
  }

  @Override
  public Class<?> getModelClass() {
    return Customer.class;
  }
}
The final step is to wrap everything in fluent API:
Forger<ModelInterface> forger = new Forger(modelGraph, new MicroOrm());
Order order = forger.iNeed(Order.class).in(contentResolver);

// note: we didn't created the Customer dependency of Order, but:
assertThat(order.customer_id).isNotEqualTo(0);

// of course we can create Customer first and then create Order for it:
Customer customer = forger.iNeed(Customer.class).in(contentResolver);
Order anotherOrder = forger.iNeed(Order.class).relatedTo(customer).in(contentResolver);

assertThat(anotherOrder.customer_id).isEqualTo(customer.id);

// or if we need multiple orders for the same customer:
Customer anotherCustomer = forger.iNeed(Customer.class).in(contentResolver);
Forger<ModelInterface> forgerWithContext = forger.inContextOf(anotherCustomer);

Order orderA = forgerWithContext.iNeed(Order.class).in(contentResolver);
Order orderB = forgerWithContext.iNeed(Order.class).in(contentResolver);

assertThat(orderA.customer_id).isEqualTo(anotherCustomer.id);
assertThat(orderB.customer_id).isEqualTo(anotherCustomer.id);

The most pathological case in our code base was a test with 10 lines of code calling over 100 lines of helper methods and 6 lines of the actual test logic. The Forger library allowed us to get rid of all the helper methods and reduce the 10 lines of setup to 1 fluent API call (it's quite a long call split into few lines, but it's much prettier than the original code).

Check out the code on github and don't forget to star this project if you find it interesting.

The funny thing about this project is that it's a byproduct of Thneed, which I originally wrote to solve another problem. It makes me think that the whole idea of defining the relationships as a visitable structure is more flexible than I originally anticipated and it might become the cornerstone of the whole set of useful tools.

Tuesday, August 20, 2013

Proguard gotcha

A while ago I wrote about removing the logs from release builds using Proguard. As usual, I've found a gotcha that might cost you a couple hours of head scratching.

Let's say that we have a code like this somewhere:
package com.porcupineprogrammer.proguardgotcha;

import android.app.Activity;
import android.os.Bundle;
import android.util.Log;

public class MainActivity extends Activity {
  static final String TAG = "ProguardGotcha";

  @Override
  protected void onCreate(Bundle savedInstanceState) {
    super.onCreate(savedInstanceState);

    Log.d(TAG, doNotRunOnProduction());
  }

  private String doNotRunOnProduction() {
    Log.e(TAG, "FIRE ZE MISSILES!");

    return "Harmless log message";
  }
}
The doNotRunOnProduction() method might perform some expensive database query, send some data over the network or launch intercontinental missiles - anyways do something that you don't want to happen in production app. If you run the code on the debug build you'll of course get the following logs.
08-20 19:31:34.183    1819-1819/com.porcupineprogrammer.proguardgotcha E/ProguardGotcha: FIRE ZE MISSILES!
08-20 19:31:34.183    1819-1819/com.porcupineprogrammer.proguardgotcha D/ProguardGotcha: Harmless log message
Now, let's add Proguard config that removes all the Log.d() calls:
-assumenosideeffects class android.util.Log {
  public static *** d(...);
}
We might expect the Log.e() call to be gone as well, but alas, here is what we get:
08-20 19:34:45.733    2078-2078/com.porcupineprogrammer.proguardgotcha E/ProguardGotcha: FIRE ZE MISSILES!
The key point to understanding what is happening here is the fact that the Proguard does not operate on the source code, but on the compiled bytecode. In this case, what the Proguard processes is more like this code:
@Override
protected void onCreate(Bundle savedInstanceState) {
  super.onCreate(savedInstanceState);

  String tmp = doNotRunOnProduction();
  Log.d(TAG, tmp);
}
One might argue that the temporary variable is not used and Proguard should remove it as well. Actually that might happen if you add some other Proguard configuration settings, but the point of this blog post is that when you specify that you want to remove calls to Log.d(), you shouldn't expect that any other calls will be affected. They might, but if your code really launches the missiles (or does something with similar effect for your users), you don't want to bet on this.

Sunday, August 18, 2013

Gradle - first impressions

Android Studio kept nagging me about make implementation deprecation, so I decided to try the new build system based on Gradle. At first I obviously hit the missing Android Support Repository issue, but after installing missing component in Android SDK Manager everything was created correctly (AFAIK the v0.2.3 of Android Studio doesn't have this issue anymore). On Mac I also had to set the ANDROID_HOME env variable to be able to build stuff from command line.

The app templates are a bit outdated, for example you might get rid of the libs/android-support-v4.jar, because gradle will anyways use the jar from aforementioned Android Support Repository. The build.gradle also references older support lib and build tools so you should probably bump it to the latest versions.

Adding the dependency to the local jar is trivially easy - we need just one line in dependencies section:
dependencies {
  compile files("libs/gson-2.2.4.jar")
}
You can also define dependency to every jar in libs directory:
dependencies {
  compile fileTree(dir: 'libs', include: '*.jar')
}
Using code annotation processors (like butterknife) is also trivial:
repositories {
  mavenCentral()
}

dependencies {
  compile 'com.jakewharton:butterknife:2.0.1'
}
The fist of the gradle's ugly warts is related to the native libs support. You can add the directory with *.so files, the build will succeed, but you'll get the runtime errors when your app will try to call native method. The workaround found on teh interwebs is to copy your native libs into the following directory structure:
lib
lib/mips/*.so
lib/other_architectures/*.so
lib/x86/*.so
NOTE: there is no typo, the top level directory should be a singular "lib". Then you have to zip the whole thing, rename it to *.jar and include as a regular jar library. Lame, but does the trick.

Let's get back to the good parts. The list of the tasks returned by "gradlew tasks" command contains the installDebug task, but not the installRelease one. This happens, because there is no default apk signing configuration for release builds. The simplest workaround is to use the same configuration as debug builds:
android {
  buildTypes {
    release {
      signingConfig signingConfigs.debug
    }
  }
}
But in the real project you should of course define the real signing configuration along the lines:
android {
  signingConfigs {
    release {
      storeFile file("release.keystore")
      storePassword "XXX"
      keyAlias "XXX"
      keyPassword "XXX"
    }
  }

  buildTypes {
    release {
      signingConfig signingConfigs.release
    }
  }
}
The other useful setting that goes into the buildTypes section is the Proguard configuration. Proguard is disabled by default in gradle builds so we need to turn it on for release builds; we also need to specify the rules to be used by Proguard:
android {
  buildTypes {
    release {
      runProguard true
      proguardFiles getDefaultProguardFile('proguard-android-optimize.txt'), file('proguard').listFiles()
      signingConfig signingConfigs.release
    }
  }
}
There are two nice things about this configuration: we can easily specify that we want to use the default rules defined in Android SDK and we can specify multiple additional files. In the configuration above I use all files from 'proguard' directory, but you can defined a simple list of files as well. It allows you to create a reusable Proguard config files for the commonly used libraries like ActionBarSherlock or google-gson.
So far so good. Let's declare the dependency on another project (a.k.a. module):
dependencies {
  compile project(':submoduleA')
}
Note that this is also declared in the app project's build.gradle. It's perfectly fine to include this kind of dependency in your app project, but I'm not happy with this solution for declaring dependencies between subprojects, because we're introducing dependencies to main project's structure.
// in build.gradle in main project

dependencies {
  compile project(':submoduleA')
  compile project(':submoduleB')
}

// in build.gradle of submoduleB, which depends on submoduleA

dependencies {
  compile project(':submoduleA')
}
It's especially bad when those subprojects are reusable libraries which should be completely separate from your main project. The workaround I read about, but haven't tested myself is creating a local Maven repository and publishing the artifacts from subprojects. AFAIK you still have to publish the artifacts in the right order, so you still have to kind of manually manage your dependencies, which IMO defeats the purpose of having .

I feel I'm missing something elementary. The way I expect it to work is to define in each project what kind of artifacts are created, define artifacts each project depends on and let Gradle figure out the order of building subprojects. Please drop me a line if what I just wrote doesn't make any sense, I expect too much from the build system, or I missed some basic stuff.

Another thing that's not so great is the long startup time. Even getting the list of available tasks for a simple project takes between 5 and 8 seconds on 2012 MBP every single time. I understand why this happens - build configs theoretically can check the weather forecast and use different configuration on a rainy days - and that this overhead is negligible when compared to the actual build time, but every time I stare a this "Loading" prompt I think that this should be somehow cached.

It's time to wrap this blog post up. The main question I asked myself was: is it worth to move to gradle? I'd say that if you have a manageable Maven build, then you shouldn't bother (yet), but it's a huge step forward when compared to ant builds.

Saturday, August 17, 2013

MicroOrm and Thneed available on Maven Central

I've uploaded my two experimental projects, MicroOrm and Thneed, to Maven Central. If you want to try them out, just add the following lines to your pom.xml:
<dependency>
  <groupId>org.chalup.thneed</groupId>
  <artifactId>thneed</artifactId>
  <version>0.3</version>
</dependency>

<dependency>
  <groupId>org.chalup.microorm</groupId>
  <artifactId>microorm</artifactId>
  <version>0.2</version>
</dependency>
Don't hesitate to email me, create an issue on github or propose a pull request. Any form of feedback is welcome!